概述
本文主要内容涉及为:寻找设备驱动,定制内核配置选项以及选项说明。
1.1 天下文章一大抄
为什么文档的开始列出一个天下文章一大抄呢?天下文章一大抄,古人曾经戏谑的说“天下文章一大抄”用来形容那些文抄们,这句话听起来难听,但仔细品味,天下文章有很多是基于古人的基础而写来的,有的人在抄别人的基础上写写点评和自己的见解,有些则是东拼西凑的组成一个文章,可谓是我中有你,你中有我的境界了。
很少有技术文章或论文来自原创,在写文章的时候难免会引用别人的文章。本系列文章也会引用别人的文章和图片。
2 选择驱动
构建内核最困难的就是确定让计算机正常工作需要哪些驱动和内核选项,本章节将从怎么判别设备的驱动开始说起。
这里我们将提供两个例子来说明寻找驱动的过程。寻找网卡和磁盘设备
2 .1确定网络设备驱动
网卡在计算机系统中是最常见的和最重要的设备之一,我们要为我们的计算机配置正确的网卡驱动来让网卡为我们的计算机进行服务
首先我们查看一下我们的网卡设备
[root@qfong.com ~]# ls /sys/class/net/
em1  lo
Lo 设备代表回环设备
首先我们找到我们关心的设备em1
[root@qfong.com ~]# ifconfig

em1       Link encap:Ethernet  HWaddr 00:24:7E:04:84:76
          inet addr:10.2.1.170  Bcast:10.2.255.255  Mask:255.255.0.0
          inet6 addr: fe80::224:7eff:fe04:8476/64 Scope:Link
          UP BROADCAST RUNNING MULTICAST  MTU:1500  Metric:1
          RX packets:166188 errors:0 dropped:1347 overruns:0 frame:0
          TX packets:155314 errors:0 dropped:0 overruns:0 carrier:0
          collisions:0 txqueuelen:1000
          RX bytes:31902670 (30.4 MiB)  TX bytes:26229476 (25.0 MiB)
          Interrupt:16 Memory:fc200000-fc220000
根据这张图我们可以得出em1设备是正在工作的设备,便是我们需要的以太网设备
为了使em1设备能在新的内核中工作,我们需要为其寻找驱动文件,在sysfs文件系统中跟踪链接是很简单的:
[root@qfong.com ~]# basename `readlink /sys/class/net/em1/device/driver/module`
e1000e
该表输出表明e1000e正在控制我们的em1设备
这个跟踪过程是怎么实现的呢?
Basename命令将完成以下工作:
1 跟踪链接符号/sys/class/net/em1/device进入em1设备信息文件的/sys/device目录下:
[root@qfong.com em1]# ll
total 0
-r--r--r--. 1 root root 4096 Oct  9 01:27 addr_assign_type
-r--r--r--. 1 root root 4096 Oct  8 20:46 address
-r--r--r--. 1 root root 4096 Oct  9 01:27 addr_len
-r--r--r--. 1 root root 4096 Oct  9 01:27 broadcast
-r--r--r--. 1 root root 4096 Oct  9 01:27 carrier
lrwxrwxrwx. 1 root root    0 Oct  8 20:46 device -> ../../../0000:00:19.0
-r--r--r--. 1 root root 4096 Oct  9 01:20 dev_id
-r--r--r--. 1 root root 4096 Oct  9 01:27 dormant
-r--r--r--. 1 root root 4096 Oct  9 01:27 duplex
-r--r--r--. 1 root root 4096 Oct  9 01:27 features
-rw-r--r--. 1 root root 4096 Oct  9 01:27 flags
-rw-r--r--. 1 root root 4096 Oct  9 01:27 ifalias
-r--r--r--. 1 root root 4096 Oct  8 20:46 ifindex
-r--r--r--. 1 root root 4096 Oct  9 01:27 iflink
-r--r--r--. 1 root root 4096 Oct  9 01:27 link_mode
-rw-r--r--. 1 root root 4096 Oct  9 01:27 mtu
-rw-r--r--. 1 root root 4096 Oct  9 01:27 netdev_group
-r--r--r--. 1 root root 4096 Oct  9 01:27 operstate
drwxr-xr-x. 2 root root    0 Oct  9 01:07 power
drwxr-xr-x. 4 root root    0 Oct  9 01:07 queues
-r--r--r--. 1 root root 4096 Oct  9 01:27 speed
drwxr-xr-x. 2 root root    0 Oct  9 01:07 statistics
lrwxrwxrwx. 1 root root    0 Oct  8 20:46 subsystem -> ../../../../../class/net
-rw-r--r--. 1 root root 4096 Oct  9 01:27 tx_queue_len
-r--r--r--. 1 root root 4096 Oct  8 20:46 type
-rw-r--r--. 1 root root 4096 Oct  8 20:46 uevent
进入device目录内
[root@qfong.com device]# ll total 0 -rw-r--r--. 1 root root 4096 Oct 9 01:27 broken_parity_status -r--r--r--. 1 root root 4096 Oct 8 20:46 class -rw-r--r--. 1 root root 256 Oct 8 20:46 config -r--r--r--. 1 root root 4096 Oct 9 01:27 consistent_dma_mask_bits -r--r--r--. 1 root root 4096 Oct 8 20:46 device -r--r--r--. 1 root root 4096 Oct 9 01:27 dma_mask_bits lrwxrwxrwx. 1 root root 0 Oct 8 20:46 <strong><span style="color: #ff0000;">driver -> ../../../bus/pci/drivers/e1000e</span></strong> -rw-------. 1 root root 4096 Oct 9 01:27 enable lrwxrwxrwx. 1 root root 0 Oct 9 01:27 firmware_node -> ../../LNXSYSTM:00/device:00/PNP0A03:00/device:07 -r--r--r--. 1 root root 4096 Oct 8 20:46 irq -r--r--r--. 1 root root 4096 Oct 9 01:27 local_cpulist -r--r--r--. 1 root root 4096 Oct 8 20:46 local_cpus -r--r--r--. 1 root root 4096 Oct 9 01:07 modalias -rw-r--r--. 1 root root 4096 Oct 9 01:27 msi_bus drwxr-xr-x. 3 root root 0 Oct 8 20:46 net -r--r--r--. 1 root root 4096 Oct 9 01:27 numa_node drwxr-xr-x. 2 root root 0 Oct 9 01:07 power --w--w----. 1 root root 4096 Oct 9 01:27 remove --w--w----. 1 root root 4096 Oct 9 01:27 rescan --w-------. 1 root root 4096 Oct 9 01:27 reset -r--r--r--. 1 root root 4096 Oct 8 20:46 resource -rw-------. 1 root root 131072 Oct 9 01:27 resource0 -rw-------. 1 root root 4096 Oct 9 01:27 resource1 -rw-------. 1 root root 32 Oct 9 01:27 resource2 lrwxrwxrwx. 1 root root 0 Oct 8 20:46 subsystem -> ../../../bus/pci -r--r--r--. 1 root root 4096 Oct 9 01:27 subsystem_device -r--r--r--. 1 root root 4096 Oct 9 01:27 subsystem_vendor -rw-r--r--. 1 root root 4096 Oct 8 20:46 uevent -r--r--r--. 1 root root 4096 Oct 8 20:46 vendor
2 在该目录下我们看到一个绑定到这个设备驱动的符号链接driver。我们进入driver目录下:
[root@qfong.com driver]# ll total 0 lrwxrwxrwx. 1 root root 0 Oct 9 01:36 0000:00:19.0 -> ../../../../devices/pci0000:00/0000:00:19.0 --w-------. 1 root root 4096 Oct 9 01:36 bind lrwxrwxrwx. 1 root root 0 Oct 9 01:20 module -><strong><span style="color: #ff0000;"> ../../../../module/e1000e</span></strong> --w-------. 1 root root 4096 Oct 9 01:36 new_id --w-------. 1 root root 4096 Oct 9 01:36 remove_id --w-------. 1 root root 4096 Oct 8 20:46 uevent --w-------. 1 root root 4096 Oct 9 01:36 unbind
3我们看到有一个包含这个设备驱动的符号链接module,我们要的便是这个链接目标,可以通过readlink命令得到它:
[root@qfong.com driver]# readlink module
<strong><span style="color: #ff0000;">../../../../module/e1000e</span></strong>
4 由于我们只关心他的模块名称,所以对readlink获得多余的路径我们并不关心。所以我们便可以取得模块名
[root@qfong.com driver]# basename ../../../../module/e1000e
<strong><span style="color: #ff0000;">e1000e</span></strong>
所以
[root@qfong.com ~]# basename `readlink /sys/class/net/em1/device/driver/module`
便是我们想要的结果.
现在我们已经得到模块的名称了,还需要得到控制它的内核配置选项,我们可以获得这个选项
通过Makefile文件获得
[root@qfong.com linux-2.6.38.x86_64]# find -type f -name Makefile |xargs grep e1000e
./drivers/net/Makefile:obj-$(<strong><span style="color: #ff0000;">CONFIG_E1000E</span></strong>) += e1000e/
./drivers/net/e1000e/Makefile:obj-$(<strong>CONFIG_E1000</strong>E) += e1000e.o
./drivers/net/e1000e/Makefile:e1000e-objs := 82571.o ich8lan.o es2lan.o \
我们在内核的配置文件里搜寻到我们要找的模块e1000e(这里你需要换成自己想要找的驱动),在输出结果中我们便可以看到CONFIG_开始的模块名。如上表格CONFIG_E1000E便是我们要找的配置选项
有了配置选项我们需要找到内核中所需要的模块,然后找到该选项,进行启用该选项
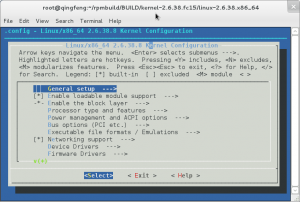
make menuconfig
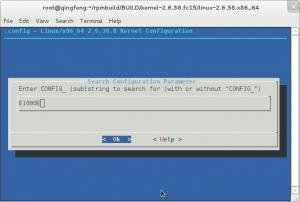
然后按下”/”键(这会启动搜索)并键入要配置的项,去掉CONFIG_部分。

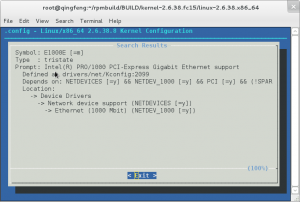
点击OK,内核配置系统便会告诉你那里选择启动这个模块

我们进入内核配置系统进行配置,配置的路径如上:
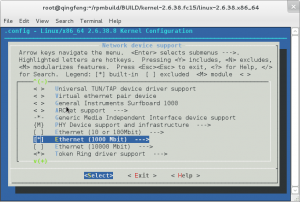
Device Drivers-->Network device support -->Ethernet
取消多余的模块,选择我们仅需要的Ethernet(1000Mbit)模块
编译便可加载该模块

